Installation
Installation Matrix#
Prudle Studio translation management portal( P-TMS) is an IIS based application which can be installed on Microsoft Windows Server 2016 or higher.
Prudle Studio Portal can also be installed on IIS server running on Windows 7, 8 and 10. However, Prudle Labs recommends to use Microsoft Windows Server in production environment.
| Component | Operating System | Database | Build Server | Web Server | Installation Type |
|---|---|---|---|---|---|
| Prudle-I18N | Windows 2007 | N/A | Jenkins 1.0.2 or higher | N/A | On-premise |
| Windows 2008 | N/A | Jenkins 1.0.2 or higher | N/A | On-premise | |
| Linux - Ubuntu 16.04 or higher | N/A | Jenkins 1.0.2 or higher | N/A | On-premise | |
| Prudle-I18N VS Plugin | Visual Studio 2015 | N/A | N/A | N/A | On-premise |
| Visual Studio 2015 | N/A | N/A | N/A | On-premise | |
| Prudle Studio Portal | MySQL 8.0 or higher | N/A | N/A | IIS 8.0 or higher | On-premise |
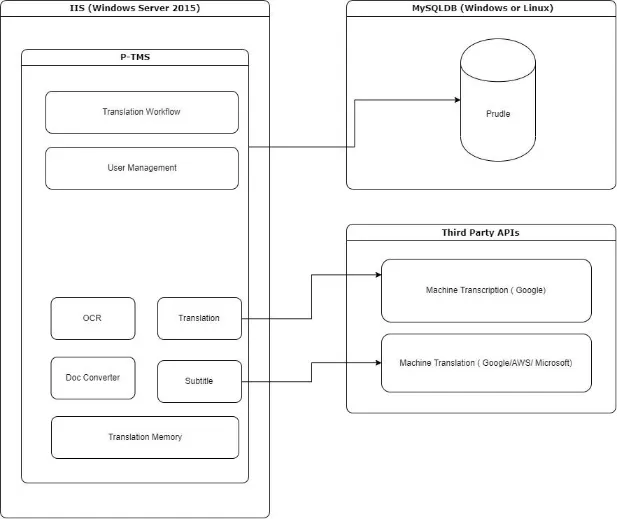
System Architecture#
A typical system architecture for P-TMS on-prem installation looks like the following diagram -
Installing P-TMS#
To use Prudle-I18N module with local on-premises deployment of report server following are the prerequisite :
- Window server 2016 with minimum 4GB RAM with Processor 2.40GHz, 2394 Mhz, 2 Core(s) or equivalent.
- Prudle-I18N Report Server is an IIS based application hence it is advised to enable IIS configuration before installing report server.
- MySQL 5.5 and above database is required to store User Management and I18N Scan Reports.
- Local or remote installation of MySQL database.
- Local or remote installation of MySQL database.
- Any configuration of system where Google Chrome is running or can be run.
Follow the following steps to install Prudle report server in your local environment :
Prerequisite:-
- MySQL database installed and running either on same hardware or remote server. In case MySQL is installed remotely, make sure that it is accessible from the server where you are installing report server.
- IIS is enabled on the server. You can do that from 'Program and Features' in 'Control Panel' of your window server.
Installation Steps:-
- Download report server installer from your download page at Prudle Customer page - PrudleReportServer.msi.
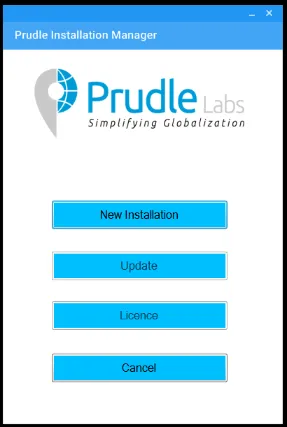
- Install the PrudleReportServer. On succesfull installation, run the newly installed application which run as installation wizard to help you set the application on local IIS.
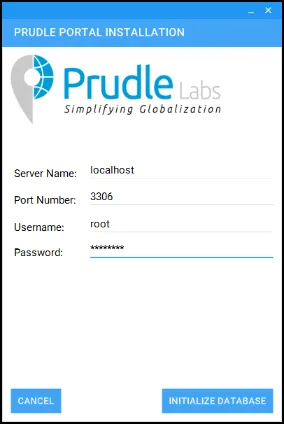
- Click on " New Installation" button to deploy a new instance of Prudle Portal on IIS ( Internet Information Services).
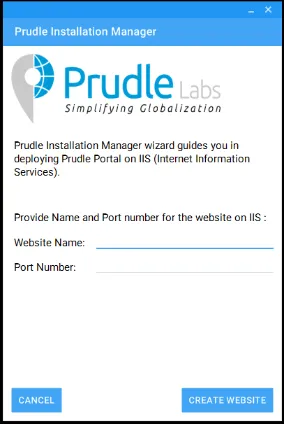
- Provide unique Website Name and Port Number.
- Click on "Create Website" button which will perform a website deployment on local IIS In this case, Website Name is Prudlelabs_User and Port Number is 96.
- Once the website is created successfully, next step is to connect to MySQL instance and initialize required database :-
- Server Name
- Port Number
- Username
- Password
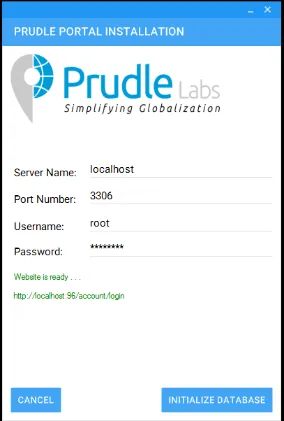
- After configuring MySQL click on "INITIALIZE DATABASE" Once the database is successfully initiated, success message will display on user's screen.
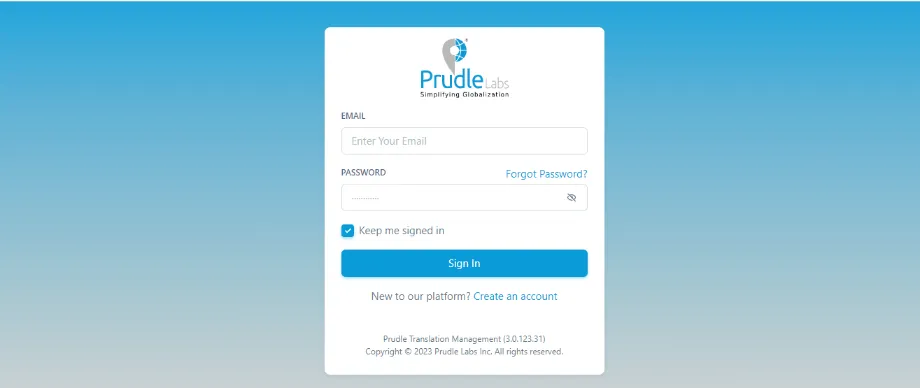
- Copy the url http://localhost:96/account/login and paste it in browser. Prudle's Login Page will open
- User now have to register as a first user by clicking on "Sign Up" button.
- At registration step, fill up the required information which will be used at the time of Sign-in.
- Click on "Next" button
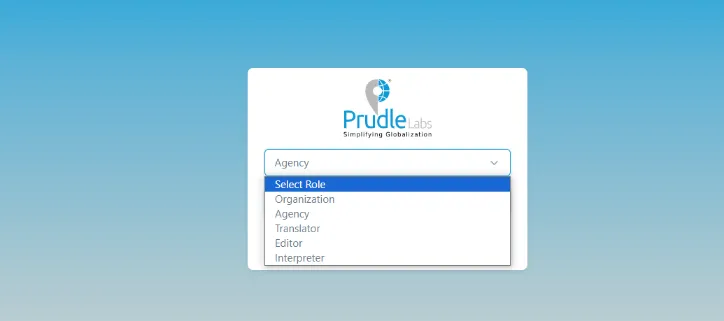
- Select role from drop-down which user assigned to himself while signing-up. In case of I18N user select "Organization" role and click on "Register" button.
- Congratulations !! You have successfully registered. Now user can login with the valid credentials which was used at the time of registration.
- User will get licence related error message if licence is not present in the website folder. Licence.lic file can be downloaded from the download section.
- User will get licence related error message if licence is not present in the website folder. Licence.lic file can be downloaded from the download section
- After downloading the licence, create a new folder naming "Licence" in this path of folder "C:\inetpub\wwwroot\Prudlelabs_User\appviews" and paste it.
- Once license folder is created and .lic file is copied user can now Sign-in. After Sign-in, user will be asked for to update login credentials.
- After successfully updating the details, user now signed- in as an Organization user.
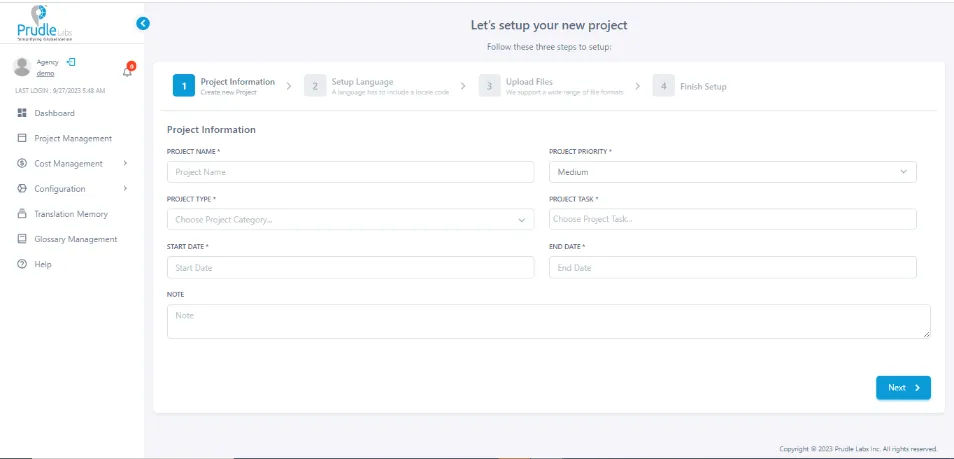
- User can create a new project by clicking on "Create Project" button.
- Application is now ready to use. Configure PrudleConfig.xml accordingly and user should be able to access reports on local server.
- If administrator user don't have access to P-I18N or P-TMS after logging into the portal then update the valid Licence file by replacing old licence file in this folder : C:\inetpub\wwwroot\Prudlelabs_User\appviews\Licence

After installation configure email related config in web.config
                                         <add key="username" value="" />
                                            <add key="password" value="" />
                                                <add key="portno" value="" />

Configure TM and NLP API#
To use Prudle-TMS Python TM and NLP api Please follow this prerequisite:
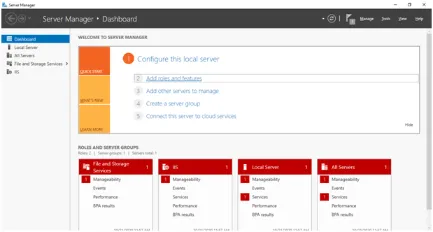
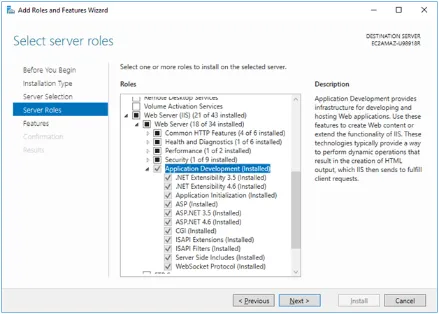
- Enable CGI in IIS Manager and enable all option under Application Development. Open server manager and enable CGI option in ADD ROLES AND FEATURE WIZARD as follows:
- Install MySQL Community Latest Version (after Installation setup my sql server with some user and password)
- Install Latest Python Version and also check include in Path Variable while starting installing. While installing on first window after double clicking the exe remember to select the check box for automatic setting the path variables. After Python make sure installed folder have Full control permission for IIS_IUSRS.
- Download and Install Visual C++ build Tool
- After installation python install all supported python library as mention below Make sure have the latest pip
- python.exe -m pip install --upgrade pip
- p pip3 install wfastcgi
- Pandas: pip3 install pandas
- numpy: pip3 install numpy
- nltk.corpus : pip3 install nltk (now for downloading every dependencies of nltk) Open cmd type Python (ENTER) Write bellow lines:
- import nltk
- import nltk
- pprint: pip3 install pprintpp
- re2: pip3 install re2
- glob: pip3 install glob2
- json: pip3 install jsonlib --- ERROR
- flask_caching: pip3 install Flask-Caching
- flask: pip3 install Flask
- configparser: pip3 install configparser
- MySql: pip3 install mysql
- MySql Connector: pip3 install mysql-connector-python
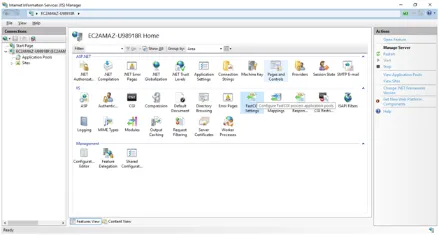
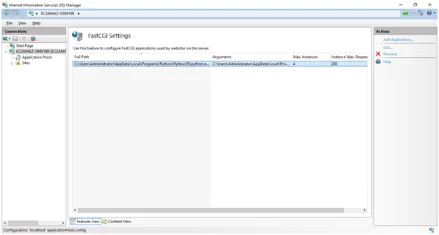
- Fast CGI setting under IIS Add FastCGI application Setting under IIS
- Now Place web.config under respected python api folder with proper python and wfastcgi path
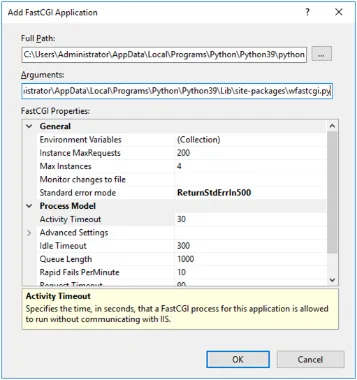
For TMAPI:
Folder Path: C:\inetpub\wwwroot\TMAPI
web.config
After installation configure email related config in web.config
                                    <?xml version="1.0" encoding="UTF-8"?>
                                    <configuration>
                                    <system.webServer>
                                    <handlers accessPolicy="Read, Execute, Script">
                                    <add name="TMapi_Handler" path="*" verb="*" modules="FastCgiModule" scriptProcessor="C:\Users\Administrator\AppData\Local\Programs\Python\Python38\python.exe|C:\Users\Administrator\AppData\Local\Programs\Python\Python38\Lib\site-packages\wfastcgi.py" resourceType="Unspecified" requireAccess="Script" />
                                    </handlers>
                                    </system.webServer>

                                    <appSettings>
                                    <!-- Required settings -->
                                    <add key="WSGI_HANDLER" value="api.app" />
                                    <add key="PYTHONPATH" value="C:\inetpub\wwwroot\TMAPI" />
                                    </appSettings>
                                    </configuration>
After placing web.config make sure folder have Full control permission for IIS_IUSRS.
For NLP PythonAPI
Folder for Python API: C:\inetpub\wwwroot\NLPAPIweb.config
                                    <?xml version="1.0" encoding="UTF-8"?>
                                    <configuration>
                                    <system.webServer>
                                    <handlers accessPolicy="Read, Execute, Script">
                                    <add name="NLPapi_Handler" path="*" verb="*" modules="FastCgiModule" scriptProcessor="C:\Users\Administrator\AppData\Local\Programs\Python\Python38\python.exe|C:\Users\Administrator\AppData\Local\Programs\Python\Python38\Lib\site-packages\wfastcgi.py" resourceType="Unspecified" requireAccess="Script" />
                                    </handlers>
                                    </system.webServer>

                                    <appSettings>
                                    <!-- Required settings -->
                                    <add key="WSGI_HANDLER" value="I18N_API.app" />
                                    <add key="PYTHONPATH" value="C:\inetpub\wwwroot\NLPAPI" />
                                    </appSettings>
                                    </configuration>
After placing web.config make sure folder have Full control permission for IIS_IUSRS.
Installing Database#
Setting Up the MySQL Database Server in the Windows Operating System.
The MySQL database server is one of the most popular open-source database servers commonly used in web application development.
Following are steps to set up the MySQL database server 5.7 versions in the Windows operating system.
Starting the Download
- Go to https://dev.mysql.com/downloads/mysql/5.7.html
- Click the Download button.
- Save the installer file to your system.
Starting the Installation
After the download completes, run the installer as follows:
- Right-click the downloaded installation file (for example, mysql-installer-community-5.6.14.0.msi) and click Run. The MySQL Installer starts.
- On the Welcome panel, select Install MySQL Products.
- On the License Information panel, review the license agreement, click the acceptance checkbox, and click Next.
- On the Find latest products panel, click Execute.
When the operation is complete, click Next. - On the Setup Type panel, choose the Custom option and click Next.
- On the Feature Selection panel, ensure MySQL Server 5.6.x is selected, and click Next.
- On the Check Requirements panel, click Next.
- On the Installation panel, click Execute.
When the server installation is completed successfully, the information message appears on the Installation panel. Click Next. - On the Configuration panel, click Next.
- At the first MySQL Server Configuration page (1/3), set the following options:
- Server Configuration Type. Select the Development Machine option.
- Enable TCP/IP Networking. Ensure the checkbox is selected and specify the options below:
- Port Number. Specify the connection port. The default setting is 3306 - leave it unchanged if there is not special reason to change it.
- Open Firewall port for network access. Select to add firewall exception for the specified port.
- Advanced Configuration. Select the Show Advanced Options checkbox to display an additional configuration page for setting advanced options for the server instance if required.
-
At the second MySQL Server Configuration page (2/3), set the following options:
- Root Account Password.
- MySQL Root Password. Enter the root user's password.
- Repeat Password. Retype the root user's password.
Note: The root user is a user who has full access to the MySQL database server - creating, updating, and removing users, and so on. Remember the root password - you will need it later when creating a sample database. - MySQL User Accounts. Click Add User to create a user account. In the MySQL User Details dialog box, enter a user name, a database role, and a password (for example, !phpuser). Click OK.
Click Next.
- Root Account Password.
- At the third MySQL Server Configuration page (3/3), set the following options:
- Windows Service Name. Specify a Windows Service Name to be used for the MySQL server instance.
- Start the MySQL Server at System Startup. Leave the checkbox selected if the MySQL server is required to automatically start at system startup time.
- Run Windows Service as. Choose either:
- Standard System Account. Recommended for most scenarios.
- Custom User. An existing user account recommended for advanced scenarios.
Click Next.
- At the Configuration Overview page, click Next.
- When the configuration is completed successfully, the information message appears on the Complete panel. Click Finish.
Click Next.