Creating Your First Project
Getting Started with Translation #
Steps to Create a Project
Below are the steps for creating a new project:
- Click on Project Management link on the left pane. The tab will further expand with multiple options.
- Click on Create Project. You will be directed to the Project Creation page where you can create your new project.
- Project Information

Following is the detailed description of theProject Creation form:
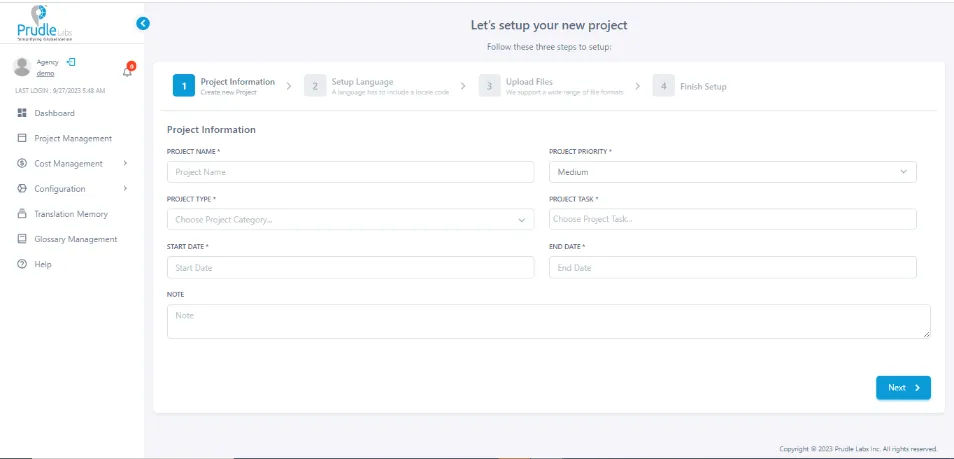
- Project Name: Enter the name
- project priority: Select the priority
- project type: Select the type
- project task: Select the Task/Tasks
- start date: Select the start date
- end date: Select the end date
- Note: Type any specific type note
- Setup Language
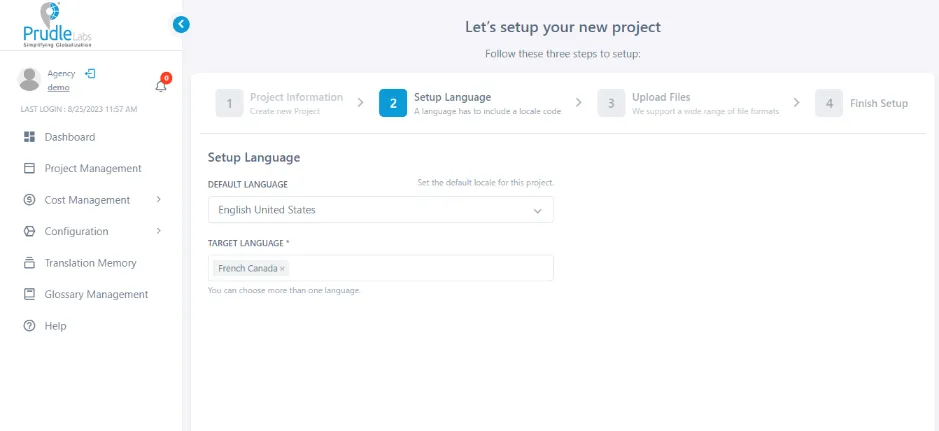
Select default and target Language.
- Upload File

- Finish Setup
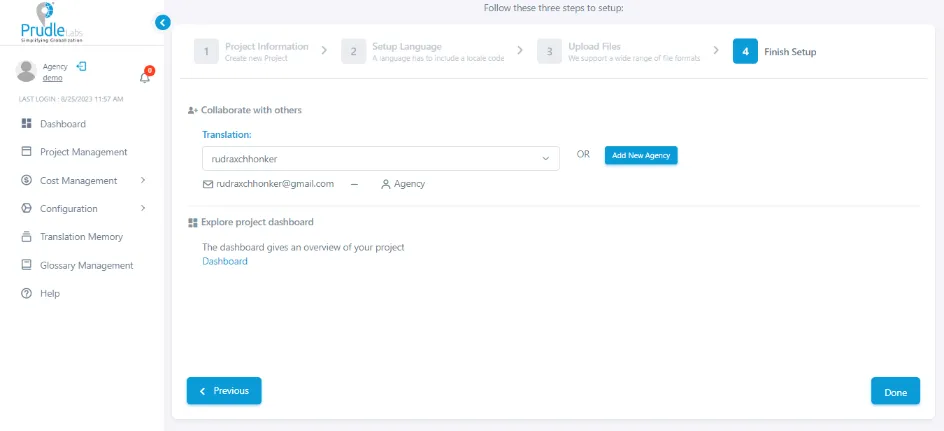
Enter the email ID that's it and click done
Instant Translation #
Instant Translation is a quick way to translate a particular document or text without going into the complexity of creating project. User can directly upload document and select source and target language and start translation.
All the documents and text translated using Instant translate will still be available through project management within a system created project where it can be viewed or downloaded later.
Project Management #
Steps to monitor and manage existing projects
- Click on Translation Management link on the left pane. The tab will further expand with multiple options.
- Click on Project Management. You will be directed to the Project Management page from where you can manage your existing pages.
This page contains a view of all the on-going projects created by you as an agency (not assigned by the client).
In this, you can view the following details of the projects assigned by the agency.
- Project Id: Unique ID assigned to each project.
- Project Priority: Displays the priority of all the project which was set at the time of creating the project.
- Project Name:Displays the name of the project. You can rename the project by click the Update button.
- Source Language: Displays the source language of the project.
- Targeted Language: Displays the targeted language of the project.
- Created Date Displays the date on which the project was created.
- Start Date: Displays the date on which the project was started.
- End date: Displays the date on which the project will be completed along with time.
- Status: Displays the status of all the projects.
- Progress: Displays the progress of the project in the form of a percentage.
- Assigned to: Displays the assignee's name.
- Approximation cost: Displays the translation cost of the projects.Note: You can see the notes which were given at the time of creating a new project. You can also provide additional information for that specific project in the form of notes.
- Action:
- Here you can perform various actions like Upload a file, Download a file, View the project summary, Delete a project, Cancel a project and Customize notifications of the project.
- Upload - Click on the icon to upload an additional file. On clicking the icon, the option to select the file from the system will appear. You can browse the file, select and upload it.
- Download -Click on the icon to download a specific file by clicking on this icon.
- Cancel -Click on the icon to cancel and existing project
- Delete - Click on the icon to delete the canceled project by clicking on the ‘Delete’ icon in the Actions column. The Project is removed from the project view and doesn’t appear in any of the views.
- Project Summary - Click on Project Summary icon to see the entire summary of the project.
- Notification - Click on Notification icon to change the notification settings.
Suggestion Box#
- Create a project and open any file of that project.
- After opening that file, the comment icon will available on each segment.
- After clicking on that icon, query box will appear on the screen containing 3 sections.
- Click on suggestion tab, it will show some translation text suggestions and percentage match of translation text related to the segment.
- If you want to use that translated text then copy and paste that text in the textbox.
Supported File Types#
As of now, Prudle’s Translation Management Portal is supporting the following file formats for translation
- docx
- xlsx
- properties
- resx
- csv
- zip
- pdf
- MP3
- MPEG
- WAV
- MOV
- AVI
Getting Started with Translation #
Steps to Create a Project
Below are the steps for creating a new project:
- Click on Project Management link on the left pane. The tab will further expand with multiple options.
- Click on Create Project. You will be directed to the Project Creation page where you can create your new project.
- Project Information
Following is the detailed description of theProject Creation form:
- Project Name: Enter the name
- project priority: Select the priority
- project type: Select the type
- project task: Select the Task/Tasks
- start date: Select the start date
- end date: Select the end date
- Note: Type any specific type note
- Setup Language
Select default and target Language.
- Upload File
- Finish Setup
Enter the email ID that's it and click done
Instant Translation #
Instant Translation is a quick way to translate a particular document or text without going into the complexity of creating project. User can directly upload document and select source and target language and start translation.
All the documents and text translated using Instant translate will still be available through project management within a system created project where it can be viewed or downloaded later.
Project Management #
Steps to monitor and manage existing projects
- Click on Translation Management link on the left pane. The tab will further expand with multiple options.
- Click on Project Management. You will be directed to the Project Management page from where you can manage your existing pages.
This page contains a view of all the on-going projects created by you as an agency (not assigned by the client).
In this, you can view the following details of the projects assigned by the agency.
- Project Id: Unique ID assigned to each project.
- Project Priority: Displays the priority of all the project which was set at the time of creating the project.
- Project Name:Displays the name of the project. You can rename the project by click the Update button.
- Source Language: Displays the source language of the project.
- Targeted Language: Displays the targeted language of the project.
- Created Date Displays the date on which the project was created.
- Start Date: Displays the date on which the project was started.
- End date: Displays the date on which the project will be completed along with time.
- Status: Displays the status of all the projects.
- Progress: Displays the progress of the project in the form of a percentage.
- Assigned to: Displays the assignee's name.
- Approximation cost: Displays the translation cost of the projects.Note: You can see the notes which were given at the time of creating a new project. You can also provide additional information for that specific project in the form of notes.
- Action:
- Here you can perform various actions like Upload a file, Download a file, View the project summary, Delete a project, Cancel a project and Customize notifications of the project.
- Upload - Click on the icon to upload an additional file. On clicking the icon, the option to select the file from the system will appear. You can browse the file, select and upload it.
- Download -Click on the icon to download a specific file by clicking on this icon.
- Cancel -Click on the icon to cancel and existing project
- Delete - Click on the icon to delete the canceled project by clicking on the ‘Delete’ icon in the Actions column. The Project is removed from the project view and doesn’t appear in any of the views.
- Project Summary - Click on Project Summary icon to see the entire summary of the project.
- Notification - Click on Notification icon to change the notification settings.
Suggestion Box#
- Create a project and open any file of that project.
- After opening that file, the comment icon will available on each segment.
- After clicking on that icon, query box will appear on the screen containing 3 sections.
- Click on suggestion tab, it will show some translation text suggestions and percentage match of translation text related to the segment.
- If you want to use that translated text then copy and paste that text in the textbox.
Supported File Types#
As of now, Prudle’s Translation Management Portal is supporting the following file formats for translation
- docx
- xlsx
- properties
- resx
- csv
- zip
- MP3
- MPEG
- WAV
- MOV
- AVI